- This topic has 5 replies, 3 voices, and was last updated 1 year, 7 months ago by
Just Jack.
-
AuthorPosts
-
02/02/2023 at 15:57 #182943
Just Jack
ParticipantAll,
0730 Local Time
9 November 1942
Near Port Lyautey, French MoroccoThe French counterattacked the invasion beaches early this morning; lucky it wasn’t aimed at Captain Henry’s Armored Reconnaissance Company, which was bloodied, confused, and sleeping in the open desert to the southwest of the invasion beaches, with barely anything worthy of being called a ‘defensive line’ established. In any case, the French pressed hard on the beaches, in two columns; Lt Olsavsky, bolstered by the Major’s late arrival, held it together just along to allow his crew-serves to separate the enemy infantry from the tanks, and then some kid named Tippett popped up and knocked out two French armored vehicles with one of those new rocket launchers!
And now we return to ‘Murderville’/’The Meatgrinder.’ To refresh your memory, the Americans hit the beach yesterday morning and secured the beaches relatively quickly, albeit with plenty of chaos and confusion owing to the inherent nature of an amphibious operation, their first taste of combat, and bad weather/sea conditions. US forces in the area were being pummeled by French artillery in and around ‘The Kasbah,’ an ancient, walled fortress; despite this, US forces quickly secured the town of Mehdi, immediately behind the invasion beaches, and Major Reisman had the idea to push mechanized elements around The Kasbah in a wide, sweeping movement to the south.
To that end, the Major ordered his Armored Reconnaissance Company commander, Captain Henry, to grab what forces he had to hand and immediately step off, hoping to catch the French off balance, but it didn’t quite work out due to the fact Captain Henry drug his feet. The mechanized column didn’t depart for more than six hours AFTER Major Reisman gave the order, and it did so under the command of 1st Lt Richards, the Armored Recon Company’s Executive Officer, because Captain Henry was still dallying on the beach. Rather than catching the enemy off guard, Lt Richards’ column ran into well-armed and determined defenses manned by French Colonial troops
Ultimately, a long and bloody battle was fought, and the French defenders held their ground. The American force fell back in disarray, leaving gear and casualties on the battlefield, to include the bodies of 1st Lt Richards and the Engineer Platoon leader, 2nd Lt Jefferson, both killed in action. Finally making his way forward, off the beaches, Captain Henry ran smack into the retreating American force, go them halted and calmed down, and began piecing together what happened. Wracked with guilt over Lt Richards’ death on a mission HE should have been leading, Captain Henry took out his wrath on Sgt Kidd, the hapless commander of an M3 Gun Motor Carriage (half-tracked tank destroyer mounting a 75mm gun), who had performed quite admirably during the battle but had failed to bring American casualties with him in the confusion of the withdrawal.
After a long, cold, jittery night in the open desert, Captain Henry and his men watched a preparatory artillery barrage pepper the objective as they moved up to the line of departure, preparing to launch their attack the moment the artillery barrage halted.

Overview, north is up. At center left, just east (right) of the crossroads, is a small oasis with a couple hovels. Below and at top left are unnamed bluffs, while at left top is a knoll identified as Hill 23, soon to be known as “Purple Heart Hill,” while at far right is Hill 55, soon to be known as “The Meatgrinder.” At top center right is Hill 34, while the village of Barhrein, soon to be known as “Murderville,” sits on either side of the bridged Wadi Sebou tributary.You can see Sgt Foster’s destroyed M3 Scout Car on the road at bottom center, Sgt Rasby’s M3 Scout Car and Sgt Parker’s destroyed M3 Stuart on/near Purple Heart Hill at left top, and the abandoned trucks of the Engineer Platoon at left center (just above the oasis).
The French have their 1st Rifle Platoon dug-into ‘Murderville’ (center top), accompanied by the overall French commander, with their Weapons Platoon (mortar and MG) dug-in right behind them, just across the Wadi Sebou (right top), and the other MG dug-in atop Hill 34. The French 2nd Rifle Platoon is dug-in on The Meatgrinder (far right), where it is accompanied by one of the 75mm guns. The other 75mm gun is dug-in just behind Hill 34 (top right), and it is accompanied by the armored vehicles (R35 tank), which is hidden between the buildings east of the Wadi Sebou (top right). It should be noted that, unlike in the last fight, where the French occupied ‘reverse-slope’ type of positions, the Americans are now aware of their presence, so they have decided to move some of their weapons forward in order to have wider field of fire.
For their part, the Americans can be seen coming in from their baseline, with advance elements of the force clustered around the crossroads (left bottom) and approaching Purple Heart Hill (left top), with the 1st Armored Recon Platoon still mounted and taking the right-hand fork, on its way The Meatgrinder, while the 2nd Armored Recon Platoon has dismounted and is just passing Purple Heart Hill on its way to Murderville.
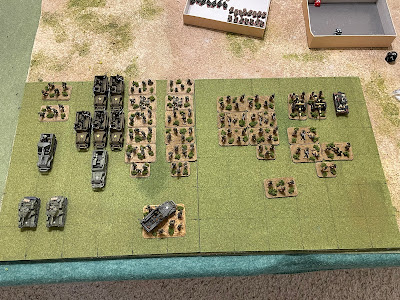
The opposing forces, with Americans at left and French at right. The Yanks have both armored infantry platoons supported by scout cars, tanks, tank destroyers, and the last remaining squad of engineers. The French have two rifle platoons supported by two guns, a tank, and mortars and machine guns.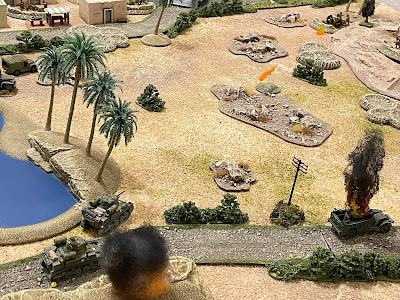
American M-3 Stuarts push forward (bottom left), dueling with a French 75mm gun at the base of the Meatgrinder (top right).
The Americans on/around Purple Heart Hill are under intense enemy small arms, machine gun, and mortar fire…
As Captain Henry orders halftracked infantry to assault the Meatgrinder.
The French tank sallies forth (bottom right), halting the column of halftracks (far left) before laying into the other US pincer on/near Purple Heart Hill (top left, with Murderville visible at top center).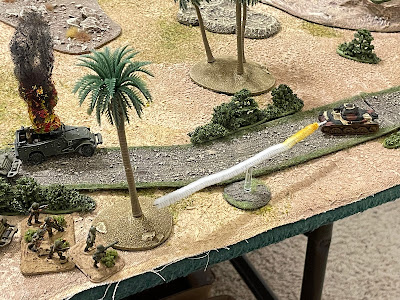
You know what time it is!To see how the fight turned out, please check the blog at:
https://hakunamatatawars.blogspot.com/2023/02/hell-on-wheels-operation-torch-fight-5.htmlNext up, the US 9th Infantry Division has been butting its head up against the wall in a series of head-on attacks on the Kasbah Mahdiya, AKA “The Kasbah.” Now it’s Task Force Reisman’s turn; the Major instinctively turned to his infantry.
V/R,
Jack03/02/2023 at 19:28 #182983MemberWith the burning halftrack already there from the start I keep thinking the armored column too heavier hit than it did. That brave little R35 deserves a medal.
The start and stop of the vehicle column gave a Market Garden feel.
03/02/2023 at 23:14 #182984ParticipantHey man. Yeah, the 1st Platoon column didn’t take that many casualties, just spent a lot of time pinned/suppressed. That’s an interesting observation about Market Garden.
V/R,
Jack
04/02/2023 at 16:19 #183017 Tony SParticipant
Tremendous table as always!
I have always loved rules that add the random events that exist in real combat. Sgt Kidd might have lost some respect from his men.
Say, in the preamble you mention Captain Henry was slow – do you a random pregame procedure to determine things like that? If so, is that your own creation, or something in 5Core? I must admit I don’t remember anything like that, but it’s been quite awhile since I’ve played or read those rules. It does sound like something Nordic Weasel would incorporate though.
04/02/2023 at 16:37 #183018MemberAgree the table loks good. I like the winding roads.
I was thinking the movie “A Bridge Too Far” where the tank column kept getting shot at and stopping.
05/02/2023 at 18:36 #183046ParticipantTony – Thank you Sir, I appreciate it! Regarding Sgt Kidd, from my standpoint it’s just down to Captain Henry being a petty, conniving @#$hole… Regarding Capt Henry being ‘slow,’ that actually happened because he’d already been in a fight and I wanted his XO to lead the next one (which was fight #3), but then the fight went haywire: the American attack failed and the XO was KIA, so then I just sort of turned the narrative into what it became and now I’m running with it.
Thomaston – Yes Sir, that’s the one, ‘A Bridge Too Far’ is about Operation Market Garden, and what you’re describing is the British XXX Corps’ attempts have its armor and infantry break through and relieve the Allied airborne divisions (US 101st, US 82nd, and British 1st, in south-to north order).
V/R,
Jack -
AuthorPosts
- You must be logged in to reply to this topic.